Creating Custom Animation Curves in Flutter
Learn how to create a custom animation curve in Flutter.

Let’s take a look at how we can create a custom Curve in Flutter. As an example we will create a Sine and Spring curve.
Before delving into the code, there are a couple of fundamental concepts we need to explore and understand.
What are Curves in Flutter?
In essence, a curve is what will give life to your animations. Compare these two animations below, and see the difference:
A curve in Flutter can be any mapping of a function over a time period t from 0.0 to 1.0.
It is essentially a function f(t) that takes a time t and outputs a value. However, we have to respect the conditions that when t = 0.0 then the function should output 0.0, and when t = 1.0 the function should output 1.0.
As an example, let’s say we have a normal linear function:
f(t) = mt+c
This is a straight line, with constants m and c, and the function is defined by input t.
Let’s make this function even more boring, and define a value of 0 for c and 1for m.
f(t) = 1t +0 = t
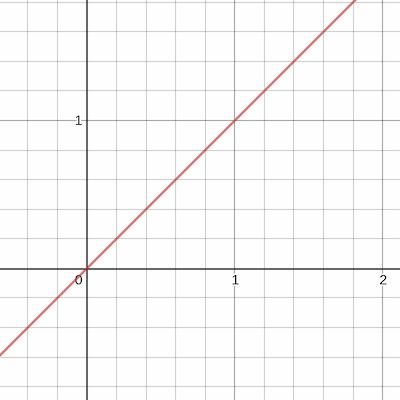
We just defined the default animation curve in Flutter: Curves.linear
Borrrinnngg…
A boring curve will make for a boring animation.
Let’s spice things up and create our own curve.
Sine Curve
Let’s create something more interesting and create a looping animation using a Sine curve.
We’ll define the following function:
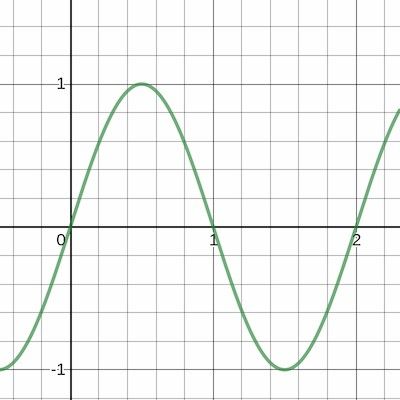
f(t) = sin(t)
But now we have a couple of problems…
Remember, our Flutter curve must meet these conditions:
f(t) = 0att = 0.0- And,
f(t) = 1att = 1
As you can see in the image above, or if you take a look at this graph, you will note that this is not the case. At t = 1 the function returns 0.
The curve also doesn’t have any oscillations (loops) within the time frame from 0 to 1. If we were to loop an animation, for example, by calling the repeat method on our AnimationController, then this curve would make a harsh transition when going from f(1) (the final value of t) back to f(0) (the start value of t).
To fix these issues we’ll need to modify the sine curve slightly:
f(t) = sine(3*2pi*t)*0.5 +0.5
In this function we multiple t by 3*2pi to get 3 oscillations, then we decrease the height of the curve by multiplying everything by 0.5, and finally we offset the curve to make sure it returns a positive value by increasing the output of the function by 0.5.
Now we have this:

This is much better, we have three full oscillations (within the range of 0 to 1) and the output values are constrained between 0 and 1.
However, this still does not map a value of 0.0 at t = 0.0 and 1.0 at t = 1.0.
Technically this could be a problem if we do a once of animation. But we want to create an animation that loops. The animation does not satisfy the 0 and 1 rule, but it works because it is looping.
It restarts the animation at the same point where it ended after completing a full oscillation (2*PI or 360 degrees).
f(0) == f(1)
This results in a smooth looping animation with some nice easing curves.
Converting To code
Let’s take the function defined above and create a curve in Flutter.
First, we need to create a new class which extends the Curve class, and then override the transformInternal method. This method receives a value t of type double, which we pass into our curve function, f(t), and then we return the value of f(t).
class SineCurve extends Curve {
  final double count;

  SineCurve({this.count = 3});

  // t = x
  @override
  double transformInternal(double t) {
    var val = sin(count * 2 * pi * t) * 0.5 + 0.5;
    return val; //f(x)
  }
}And now we have a custom curve class that we can use in our animations.
Easy as that. The math is the hardest part.
Spring Curve
In a similar way we can create a spring curve, such as the one below:

Here the math is a bit more complicated, but the code is still straightforward 🙂
Let’s just look at the code:
class SpringCurve extends Curve {
  const SpringCurve({
    this.a = 0.15,
    this.w = 19.4,
  });
  final double a;
  final double w;

  @override
  double transformInternal(double t) {
    return -(pow(e, -t / a) * cos(t * w)) + 1;
  }
}
Note: This curve almost satisfies the rule of returning 0.0 at t=0.0 and 1.0 at t=1.0. At t = 1.0 it is only close to 1.0. But it’s not noticeable when you use it in an animation.
We’re done. What’s next?
If you need unique animations in your application, or animations that require specific behavior, then knowing how to create your own curve will be of great value. There is no limit to what curve you can create.
There are also a number of ready made curves available to use in Flutter.